HDR photo editing service is a cutting-edge technique that enhances the visual depth and detail in images. It’s a tool that can transform ordinary photos into extraordinary works of art. Now you may think, is HDR good for photo editing?
Yes, absolutely. HDR, or High Dynamic Range, offers a plethora of creative possibilities. It enriches colors, enhances details, and ensures that photographers can capture visually captivating and dynamic images.
By using HDR, the quality of photography can be elevated, making images not just seen but felt. If you’re curious about how HDR can transform your photography, stick around. We’re diving deeper into this fascinating topic, and we promise, the insights you’ll gain could revolutionize the way you view photo editing.
What Does The HDR Signify in Photo Editing?
As far as photo editing is concerned, HDR can be compared to the magic wand of pictures. It stands for High Dynamic Range, a technique that amps up your photos to look more vibrant and full of life.
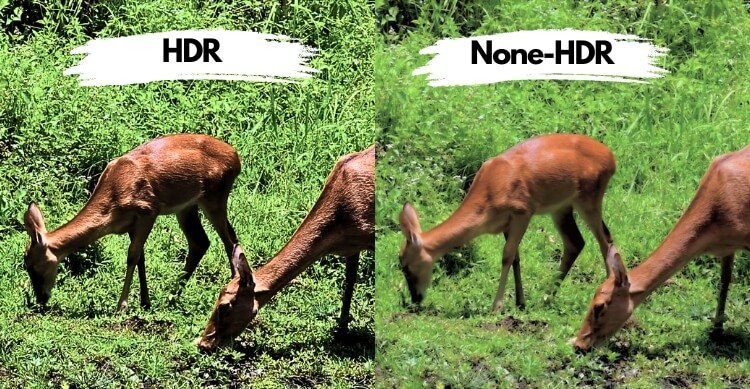
By combining multiple exposures of the same scene, HDR ensures that both the brightest and darkest parts are well-detailed. It’s perfect for scenes with contrasting lighting, where you want to capture everything just right.
Now, imagine you’re snapping a photo in a dimly lit room with a bright window. Without HDR, you’d either get a well-lit room and a white-out window or a clear view outside but a dark room. That’s where HDR comes into play, blending these exposures seamlessly. In that case, taking the help of an HDR photo editing service, you can enhance the quality and visual appeal of your photo.
HDR doesn’t mean your photos will look overcooked or unnatural. It’s all about enhancing the realism of your images, bringing out textures and colors that were lost. This tool is a favorite among photographers aiming for the perfect shot. Just remember, like any worthwhile thing, use HDR wisely to avoid oversaturation.
How Does HDR Photo Editing Work?
HDR photo editing is a magical wand for photographers aiming to breathe life into their images. It’s not just about brightness and contrast; it’s an art that enhances every pixel’s story. Here’s a sneak peek into what such a service typically offers:
- Dynamic Range Enhancement: This feature maximizes the photo’s dynamic range, beautifully balancing the lightest lights and darkest dark. It ensures that all details are crisp and clear, making every scene dramatic.
- Color Vividness: Colors pop more vividly, giving the image a fresh and lively look. It’s like seeing the world through a kaleidoscope, with each hue standing out distinctly.
- Detail Amplification: Every texture becomes more pronounced, from the roughness of tree bark to the softness of clouds. It’s about highlighting the beauty in the details that are often overlooked.
- Shadow and Highlight Adjustment: This balances the photo, ensuring no area is too bright or dark. It crafts a visual harmony, making the image pleasing to the eye.
- Contrast Optimization: The service tweaks the contrast to make the image look more dynamic. It’s not just about depth; it’s about giving the photo character.
- Noise Reduction: Your photos can look smooth and clear even in low light conditions. This feature gently removes graininess without sacrificing detail.
Is HDR Good for Photo Editing?
Yes, HDR is indeed a fantastic tool for photo editing. It opens up new creative avenues, allowing photographers to capture images with unparalleled depth and detail. By manipulating light and shadow, HDR makes it possible to convey the full spectrum of a scene’s dynamics.
Dynamic Range
HDR expands the range of light to dark in your images, making them look more like what your eyes see. It reveals details in shadows and highlights, often lost in standard photos. This means your image’s brightest and darkest parts can be detailed and clear. It’s particularly useful in scenes with a wide contrast range.
Color Accuracy and Vibrancy
By combining multiple exposures, HDR enhances color accuracy and vibrancy. Colors in HDR images appear more vivid and true to life, enhancing the overall visual appeal. This process ensures that the colors in your photos accurately reflect the real-world scene. It’s great for landscapes and sunsets, where color plays a major role.
Detail and Clarity
HDR enhances the clarity and detail of your photographs. Even the subtle textures become visible, adding to the photo’s realism. This is achieved by blending exposures; each captures different levels of detail. It’s like piecing together a puzzle where every piece is essential for the full picture.
Considerations for Use
While HDR brings many benefits, it’s important to use it judiciously. Overuse can lead to unnatural-looking images with overly harsh contrasts. Knowing when and how to use HDR can make all the difference. It’s best for scenes with significant differences in light and dark areas.
How Do You Edit Your Photos Using HDR?
Diving into HDR photo editing can transform your images from good to breathtaking. It’s a process that brings out the best in your shots, making them look more dynamic and true to life. Whether you’re a seasoned pro or just starting, mastering HDR editing is a game-changer for your photography skills.
Step 1: Capture Multiple Exposures
To start, you’ll need multiple shots of your scene, ideally using a tripod to keep the camera steady. Aim for at least three photos at different exposures: one underexposed, one correctly exposed, and one overexposed. This range captures the full spectrum of light in the scene.
Step 2: Choose Your HDR Software
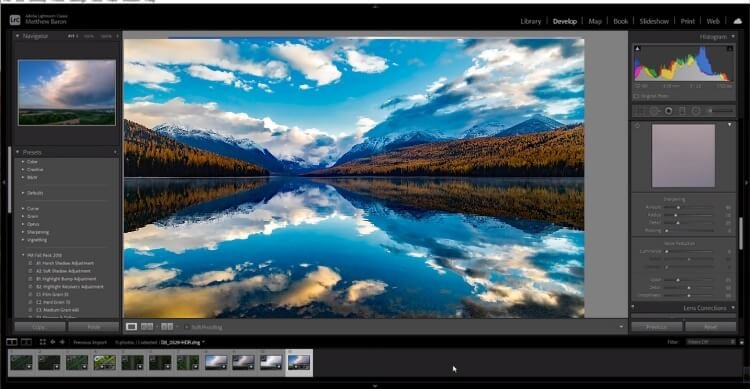
Afterward, select an HDR editing software that aligns with your requirements. A favored choice among many photographers is Adobe Lightroom, renowned for its versatility and user-friendly interface. These programs are specifically crafted to seamlessly merge your photos into a cohesive HDR image. If you’re looking to edit HDR photos in Lightroom, it’s a prime option to consider.
Step 3: Merge Your Photos
With your software of choice open, import your bracketed shots. Use the HDR merging tool to combine them into one image. This process harmonizes the different exposures, bringing detail to both the shadows and highlights.
Step 4: Adjust to Perfection
After merging, tweak the final image to your liking. Play around with the settings for brightness, contrast, saturation, and detail to enhance the HDR effect. It’s crucial to strike a balance here to maintain a natural look.
Step 5: Final Touches
Consider applying selective adjustments or filters to further refine your image. This step is about personalizing your photo, giving it a unique touch that stands out.
Ending on a high note, mastering HDR editing is like unlocking a new level in your photography journey. It’s a powerful technique that, when used skillfully, can produce stunningly realistic or artistically vivid images. Just remember, the best HDR photos are those that don’t scream “edited” but rather subtly impress with their natural beauty and detail.
How Do You Get Professional Help for HRD Photo Editing?
If you’re unsure about editing your photo using HDR then you always choose the editing service provider of your choosing. However, choosing the best HDR photo editing service can feel like finding a needle in a haystack.

With so many options, you’ll need to find a service that aligns with your vision and enhances your work rather than altering it. Here’s a straightforward guide to evaluating your choices and selecting the best service for your needs:
Step 1: Assess Your Needs
Start by understanding what you want from an HDR photo editing service. Are you looking for subtle enhancements or dramatic transformations? Identify the aspects of your photos that you’d like to improve, such as dynamic range, color vibrancy, or detail clarity. This clarity will help you pinpoint services that specialize in what you need.
Step 2: Research and Reviews
Invest some time in research. Consider the power of reviews when looking up services online. Sites like Visual Sparrow often showcase before-and-after examples, providing a clear insight into their capability and style. Reviews from previous customers can also offer valuable feedback on their satisfaction and experience.
Step 3: Trial Services
Many HDR photo editing services, including Visual Sparrow, offer trial edits or sample services. This is a fantastic way to see firsthand how your images could be transformed. It gives you a taste of the service quality and the team’s responsiveness, which are crucial to your long-term satisfaction.
Step 4: Compare Pricing and Turnaround
Cost and time are significant considerations. Compare pricing structures and turnaround times of different services. Ensure the service you choose balances quality and value without sacrificing the speed you need. Remember, the cheapest option isn’t always the best.
Step 5: Customer Support
Evaluate the level of customer support offered. A service like Visual Sparrow that provides robust support and is willing to tailor their services to your needs stands out. Good communication is key to ensuring your vision is precisely understood and met.
Choosing the right HDR photo editing service is a journey toward realizing your photographic vision. By taking these steps, you’re not just selecting a service but partnering with a team that will elevate your photography to new heights.
Remember, the goal is to enhance your images to remain true to your original vision while bringing out their best qualities.
Benefits of Editing Your Photos in HDR
Jumping into HDR photo editing is like discovering a new palette of colors for a painter. Using HDR image retouching services will enable your photos to express more than just moments. By enhancing the dynamic range, you’re not just editing photos; you’re promoting them.
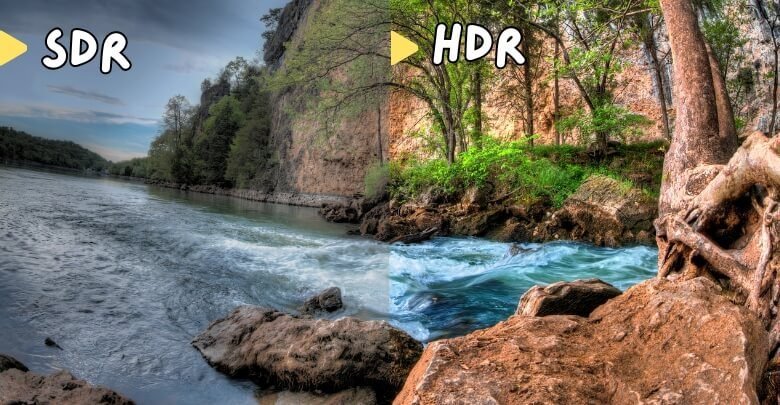
- Enhanced Details in Shadows and Highlights: HDR editing brings out the details hidden in the darkest and brightest parts of your photos. This makes for a balanced image where every element is visible.
- Richer Colors and Contrast: The technique amplifies the colors in your images, making them pop with vibrancy and depth. Your photos will have more pronounced contrasts, giving them a dramatic effect.
- Better Representation of Real-life Scenes: HDR helps your images mimic the way human eyes perceive light and color in real life. This results in photos that are more true to what you saw.
- Reduced Blurry Images in Low Light: By combining exposures, HDR can minimize the grain found in low-light photos. This means clearer, sharper images even when the lighting isn’t ideal.
- Creative Flexibility: HDR editing gives you the tools to either go for a natural look or create something surreal. It’s all about how you want your final image to convey your artistic vision.
Frequently Asked Questions about Is HDR Good for Photo Editing?
Using HDR photo editing can be intriguing, yet filled with questions. To help demystify this process, here are eight frequently asked questions about HDR and its impact on photo editing.
Can HDR Be Used for Any Type of Photography?
Yes, HDR can be beneficial for various photography types, especially landscapes, real estate, and outdoor portraits, where lighting conditions vary greatly. However, it’s less suitable for action shots or low-light conditions due to the need for multiple exposures.
Does HDR Editing Make Photos Look Unnatural?
Not necessarily. When used judiciously, HDR enhances a photo’s natural appeal without overdoing it. The key is to use HDR to bring out details and maintain a balance without making the image look overly processed.
Is HDR Necessary for Professional Photography?
While not necessary, HDR is a valuable tool for professionals looking to elevate their work. It allows for greater detail, color depth, and balance in images, making them stand out. However, its use depends on the photographer’s style and the project’s needs.
How Does HDR Affect Photo Editing Workflow?
Incorporating HDR into your workflow can increase editing time since it involves processing multiple images. However, many find the improved quality and detail in the final image worth the extra steps.
Can I Use HDR With Mobile Photography?
Absolutely. Many modern smartphones have HDR capabilities built-in, allowing you to capture and edit HDR photos directly on your device. This makes HDR more accessible to casual photographers and professionals alike.
What Are the Common Mistakes in HDR Photo Editing?
Over-saturation, excessive contrast, and halo effects are common HDR editing mistakes. These issues often arise from over-processing, underscoring the importance of moderation and striving for a natural look.
How Do I Start With HDR Photo Editing?
Begin by taking multiple photographs of your scene at different exposure levels. Then, use photo editing software that supports HDR merging, like Photoshop or Lightroom, to combine these images into a single HDR photo. Experimentation and practice are key to mastering HDR editing.
Final Words
HDR photo editing opens up a new world in which every detail, texture, and color comes to life in photographs. As a result, your images will be able to tell a more compelling story as they will have a voice. This technique enhances the visual appeal of photos and also brings them closer to the vividness and depth that our eyes are naturally able to perceive.
So, is HDR good for photo editing? as you know by now, HDR empowers photographers to overcome lighting challenges and capture their subjects’ beauty in ways previously unimaginable. By mastering HDR, you’re not just editing photos; you’re crafting masterpieces that stand out for their realism and emotional depth. It’s a journey of discovery, creativity, and enhanced storytelling through imagery.
