
Images are heavily edited in the field of digital media to enrich visual content across a wide range of industries. Whether in marketing, publishing, or online retail, image quality can dramatically influence viewer perception and engagement.
For a project to achieve its goals, it is important to choose the right editing technique according to the project requirements. In this context, understanding the differences between “clipping path vs. masking” becomes essential.
A mask controls the opacity of the elements it covers, allowing for fine-tuned visibility edits. Conversely, a clipping path is used to define the visible area of an image, effectively defining the elements within its borders.
Join us as we explore in detail the functionalities and applications of each method to see how these techniques can enhance your image editing skills and help you to achieve better results.
Clipping Path and Masking: What Are the Basics?
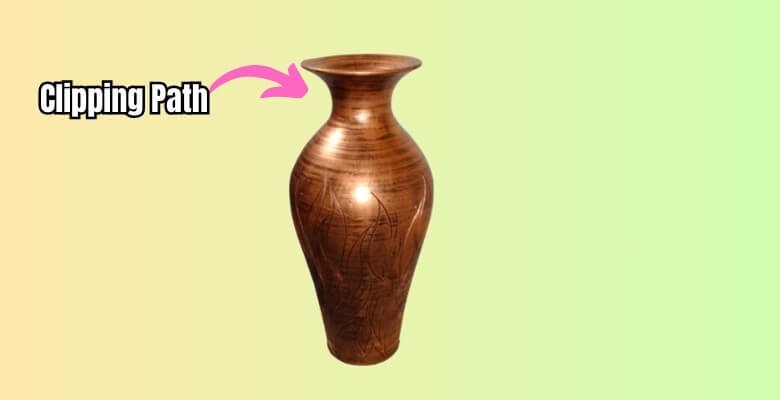
Basic knowledge of clipping paths and masking will greatly improve your image editing ability. An image editing software clipping path isolates and displays only the portions of an image you want to see in the image.
It’s like drawing a line around the areas you need, and everything inside this line will show while the rest becomes transparent. This method creates sharp, clean edges around your subject.
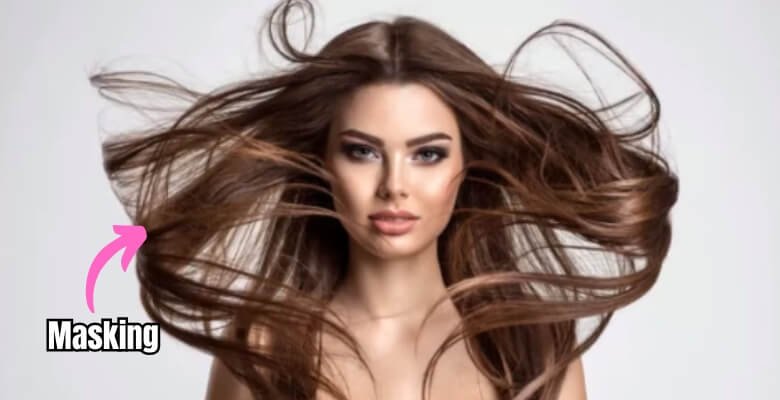
Masking, on the other hand, involves creating a layer that can hide or reveal portions of the image but with more flexibility. It allows for softer transitions and is ideal for complex images where edges are not clearly defined. For instance, masking is incredibly useful when dealing with hair or fur in photos.
The integration of a clipping path service provider company can be a game-changer for professionals and businesses that need reliable results. They bring expertise that elevates your images, ensuring they look polished and professional. So, whether you’re working on product photos or need complex image manipulations, understanding these techniques is key.
Clipping Path Vs. Masking: What Are the Differences?
Digital image editing entails two decisive techniques: Clipping Paths and Masking. These methods are crucial to crafting the most effective visuals for everything from e-commerce to print advertising. “Clipping Path Vs. Masking” isn’t just about choosing a tool; it’s about applying the right technique to enhance image quality and meet specific project needs.

Each approach offers unique benefits and suits different types of imagery, which is why understanding their differences is crucial for anyone looking to produce professional-grade photos.
Clipping Path: Precision and Simplicity
Clipping Path is renowned for its precision in isolating subjects. Creating a vector path allows for the exact selection and separation of image elements. This is particularly useful for images with sharp, clean outlines.
You can think of it as using a digital scalpel to cut out objects from their backgrounds. In e-commerce sites, this makes it ideal for showcasing products against a uniform background.
Moreover, Clipping Paths are not just about cutting things out; they also allow manipulating the object’s shape. This can be particularly useful in graphic design where elements need to be extracted or emphasized without altering their inherent properties. Choosing the right clipping path service will ensure crisp, clean cuts.
Masking: Flexibility and Finesse
Masking offers a softer, more flexible approach to image editing. Instead of cutting, it conceals or reveals parts of an image through an adjustable layer. This technique is appropriate for dealing with complex edges and intricate details, like fur, smoke, or glass. Masking allows for gradual transitions by using soft brushes or gradients, which blend the foreground and background seamlessly.
This method is particularly useful when you need to adjust the visibility of different parts of an image without losing details. It provides a non-destructive way to edit images, meaning you can make changes without permanently altering the original layers. Masking can be a lifesaver in portrait photography and fine art editing where you need to combine various elements delicately.
As a result, Clipping Path and Masking are both indispensable tools in an image editor’s arsenal. Each has its place depending on the complexity of the task and the desired outcome.
Whether you require the stark precision of a Clipping Path or the nuanced control of Masking, understanding when and how to use each method can significantly upgrade the quality of your final images.
Clipping Path Vs. Masking: Which is Right for You?
The decision between clipping paths and masking can be challenging when it comes to image editing. Both techniques offer distinct advantages, but the right one for you depends on the specific needs of your project and the effects you aim to achieve. Let’s dive into which method is best suited to your editing goals.
Clipping Path: Ideal for Sharp, Defined Edges
Clipping Path is your go-to choice when clean, precise cuts. This method excels in images where the edges are clear and distinct, making it effective for separating products from backgrounds in e-commerce shots.
It is especially effective for images that require a uniform look across multiple items, where consistency is key. If your project involves simple shapes or needs straightforward extraction from a solid background, Clipping Path can deliver excellent results with high accuracy.
Masking: Best for Complex and Detailed Images
Masking should be your preference when dealing with images containing fine details or requiring soft, blended edges. This technique is invaluable for photos with complex elements like fur, hair, or transparent objects.
Masking allows for more nuanced adjustments and layering effects, enabling you to retain the quality and detail of the original image while making sophisticated edits. If your project requires a delicate touch or involves intricate visuals, Masking offers the flexibility and control needed to achieve a natural and appealing outcome.
When to Use Clipping Path: Practical Examples
A project’s nature and the desired precision in isolating elements influence when to use Clipping Path. This technique shines in scenarios where sharp, clean cuts are essential. Let’s look at some practical examples to better understand where the Clipping Path can be particularly effective.

E-Commerce Product Listings
For e-commerce, presenting products with clarity and consistency is crucial. Clipping Path is ideal for creating uniform, distraction-free backgrounds that help products stand out. This method ensures that all items, from simple gadgets to intricate jewelry, are displayed with precise outlines, enhancing visual appeal and customer focus.
Graphic Design Projects
Graphic designers often rely on clipping paths when incorporating specific elements into a design without any background interference. This technique allows for seamless integration of images into layouts, ensuring that every edge fits perfectly within the overall design aesthetic. Whether it’s for creating brochures or digital ads, Clipping Path provides the cleanliness and precision needed.
Preparing Images for Print
When preparing images for print, precision is paramount to avoid any unwanted background noise that can distract from the main subject. Clipping Path ensures that only the desired parts of an image are visible, which is essential for high-quality prints where every detail matters. This is especially important in professional portfolios or high-stakes advertising materials.
Mastering Masking Techniques: Tips and Tricks
Any image editor seeking to handle complex images with finesse needs to master masking techniques. Masking allows nuanced control over image visibility, providing flexibility that clipping paths can’t. Here are some practical tips and tricks to help you improve your masking skills:
- Start with High-Quality Images: Higher-resolution photos offer more detail and smoother gradients for effective masking.
- Use Soft Brushes for Edges: Soft brushes in your masking tool can blend edges naturally, especially around hair or fur.
- Adjust Opacity Settings: Gradually adjusting the layer’s opacity can help achieve the perfect blend between the foreground and background.
- Leverage Layer Masks: They allow for non-destructive edits, meaning you can revisit and adjust the mask without altering the original image.
- Apply Feathering Sparingly: Feathering softens the mask edge but overuse can make the image look unrealistic.
- Use Contrast for Mask Creation: Temporarily boosting the contrast can help isolate the subject more easily to create a more accurate mask.
- Practice with Complex Shapes: Experiment with detailed objects to refine your mask-making skills.
These strategies will enable you to make professional and visually pleasing edits to your images by significantly improving your masking abilities.
FAQs About Clipping Path Vs. Masking
The ability to distinguish between clipping and masking can significantly improve your web and graphic design skills. Here are some frequently asked questions to clarify their differences and uses.
What Is Clipping vs Masking in CSS?
CSS clipping defines which parts of an element are visible, while obscuring everything else. With masking, varying opacity levels are determined by images to allow partial transparency and smooth transitions.
What is the Difference Between Clip Path And Mask In SVG?
In SVG, the clip Path is vector-based and results in crisp, clear division: elements are visible or not. By enabling partial transparencies and gradients, masks offer more flexibility.
What is the Advantage of a Clipping Mask?
A clipping mask in image editing allows you to apply edits or effects selectively to specific areas of an image. As a result, the rest of the image remains unchanged, maintaining its originality.
Can Clipping Paths And Masks Be Combined?
Yes, combining clipping paths with masks can offer enhanced control over image manipulation, especially when dealing with complex images where both sharp edges and gradual fades are required.
What Tools are Best For Creating Masks?
Photoshop offers robust tools for creating masks, such as the brush tool, gradient tool, and pen tool. Masking tools provide precision and versatility.
Is Masking Suitable For Text Effects?
Masking is ideal for creating dynamic text effects in graphic design, allowing textures or images to blend seamlessly with text for visual impact.
How Does Clipping Path Affect File Size Compared To Masking?
Clipping paths generally do not significantly impact file size because they are vector-based, whereas masks, especially those using gradient or image-based masks, can increase file size due to additional data storage.
Are There any Limitations to Clipping Paths in Web Design?
While clipping paths are powerful, they are limited to simple shapes and cannot handle complex or graduated transparency as masks can. As a result, they are less versatile for detailed web design.
Conclusion
By examining the differences between “Clipping path vs. masking,” we’ve uncovered the distinctive roles and applications of each technique in image editing. Clipping paths offer precision and are ideal for images requiring clear, defined boundaries, typically used in product photography and graphic design.
Masking, however, provides flexibility, allowing for soft transitions and partial transparency. This is suitable for complex images with detailed edges like fur or glass.
For best results, consider the specific needs of your project when choosing between these methods. Utilizing the right approach will ensure high-quality edits that amplify your images’ visual impact.